What is Laravel Nightwatch?
Laravel Nightwatch is like a health check tool for your Laravel app. It keeps an eye on your app all the time and shows you what’s happening inside, like which pages users are visiting, how fast things are loading, and if anything goes wrong.
Think of it like a personal assistant for your Laravel app. It watches everything 24/7 and gives you a clear report:
- What’s working well
- What’s slow or broken
- What needs your attention
And all of this is shown in one easy dashboard!
How It Works:
- Install the package in your Laravel app using Composer
- Add your token to your
.envfile - Run the agent using
php artisan nightwatch:agent - View your data in the Nightwatch dashboard at nightwatch.laravel.com
Step 1: Install Laravel Nightwatch
To install the package
composer require laravel/nightwatch
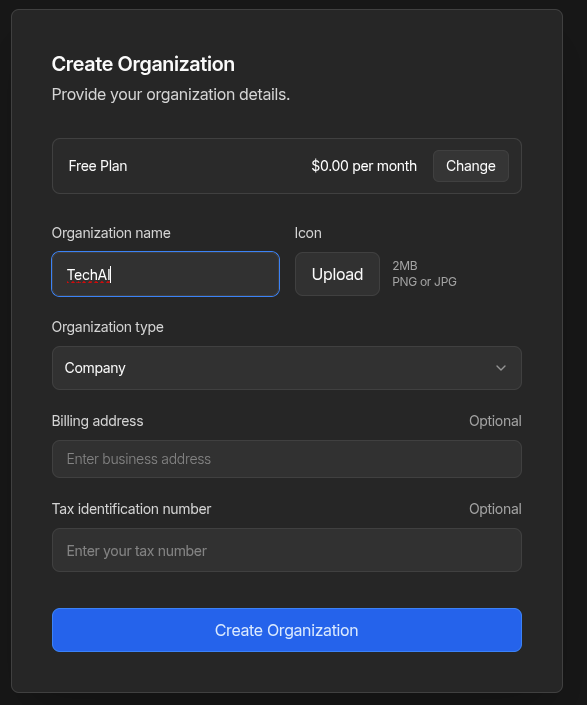
then , you need to create your account in laravel nightwatch. After creating your account, you’ll be redirected to the pricing page. Select the free plan, and you’ll see a 4-step form. In the first step, enter your organization name (or any preferred name).
then click on next

On the third screen, you’ll see the command to install Laravel Nightwatch along with an API key that you need to paste into your .env file.
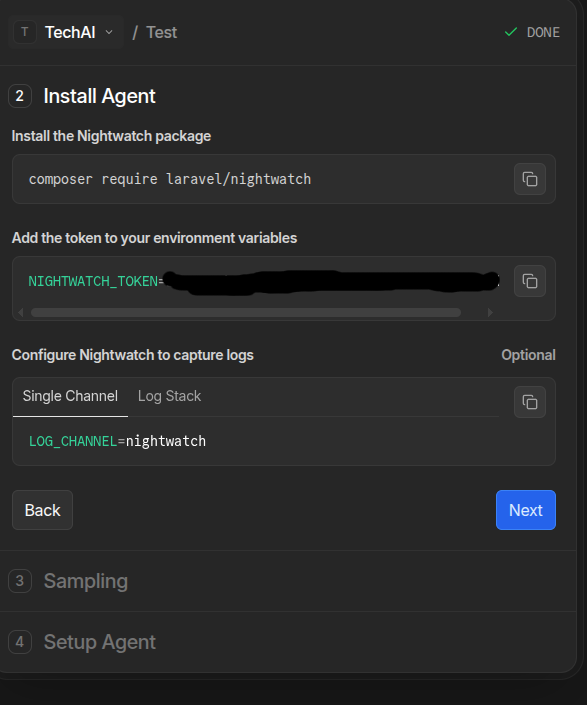
In the 4 step you see a command run this command under your project
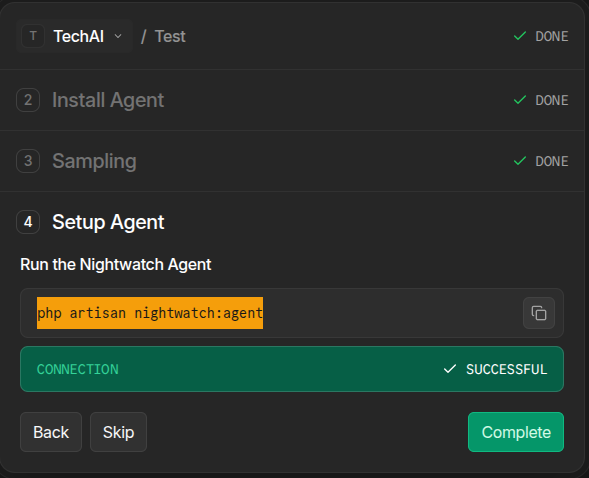
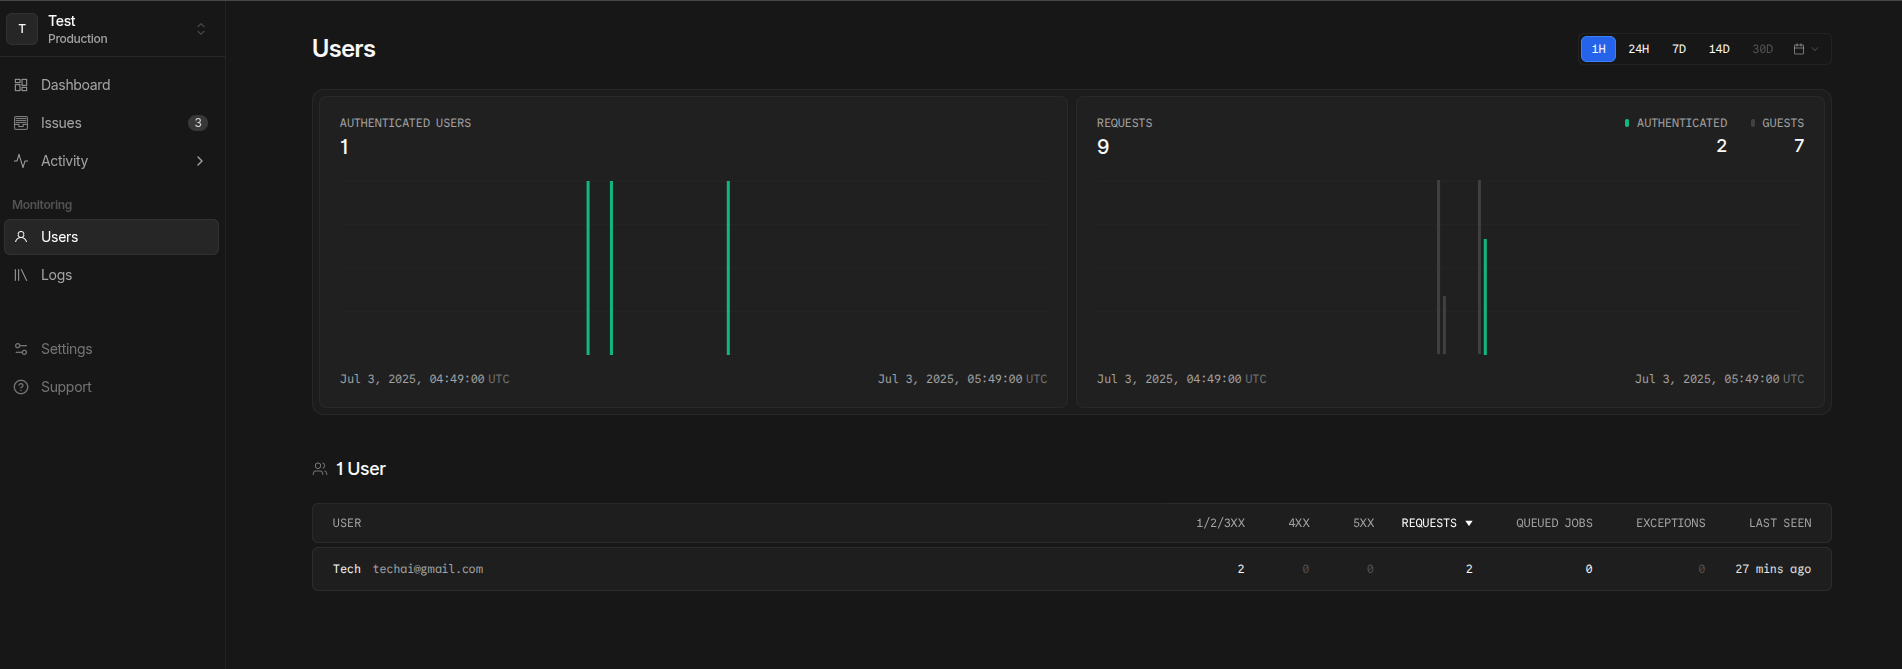
Now Nightwatch is connected to your project. When you click the “Complete” button, you’ll see a dashboard. On the left-hand side, there’s a “Users” table showing 0 users. Let try to register the user from frond end side. i already setup breez in my project.

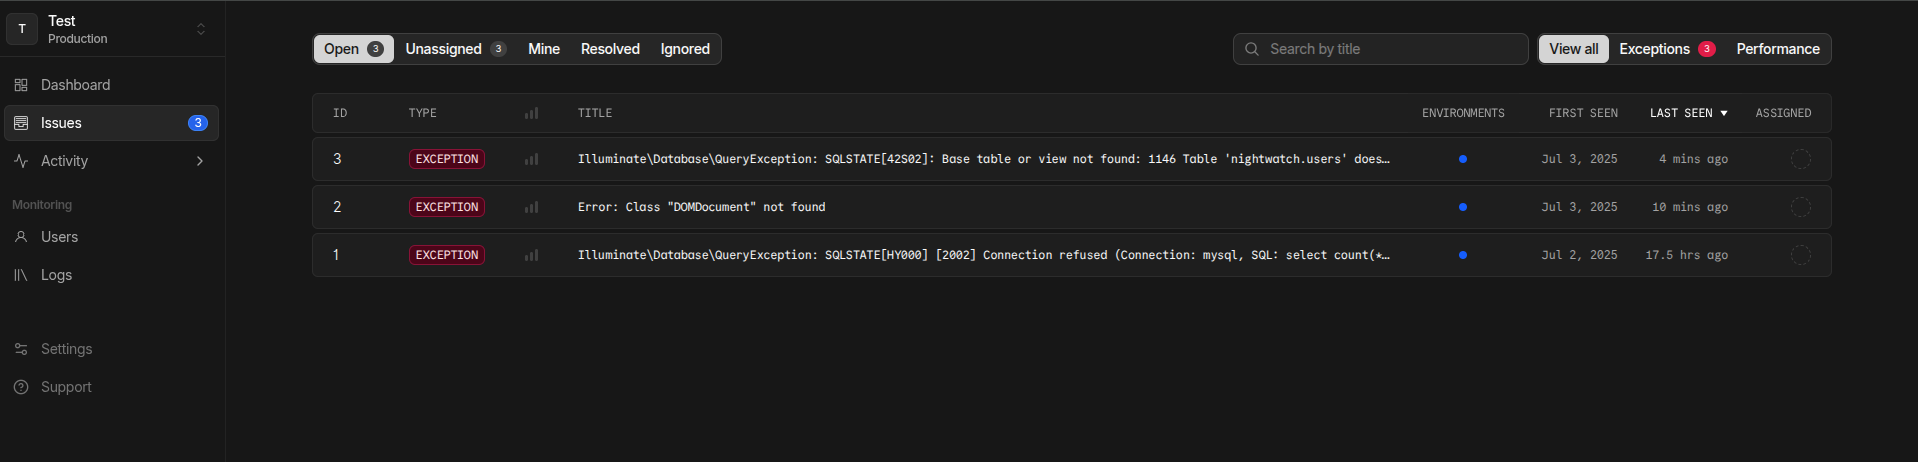
Real-Time Error Tracking in the Nightwatch Dashboard
One of the best features of Laravel Nightwatch is its ability to show real-time issues right in the dashboard. Here’s what I experienced:
- I forgot to update the
.envfile → Database connection error - There was an extension-related issue → Clearly flagged
- I forgot to run the
php artisan migratecommand → Migration error shown
✅ All these errors were neatly listed under the “Issues” section of the Nightwatch dashboard
This makes Nightwatch extremely helpful, you can catch and fix problems instantly without digging through logs.
Now you can see I register 1 user and that user is visible under the users section
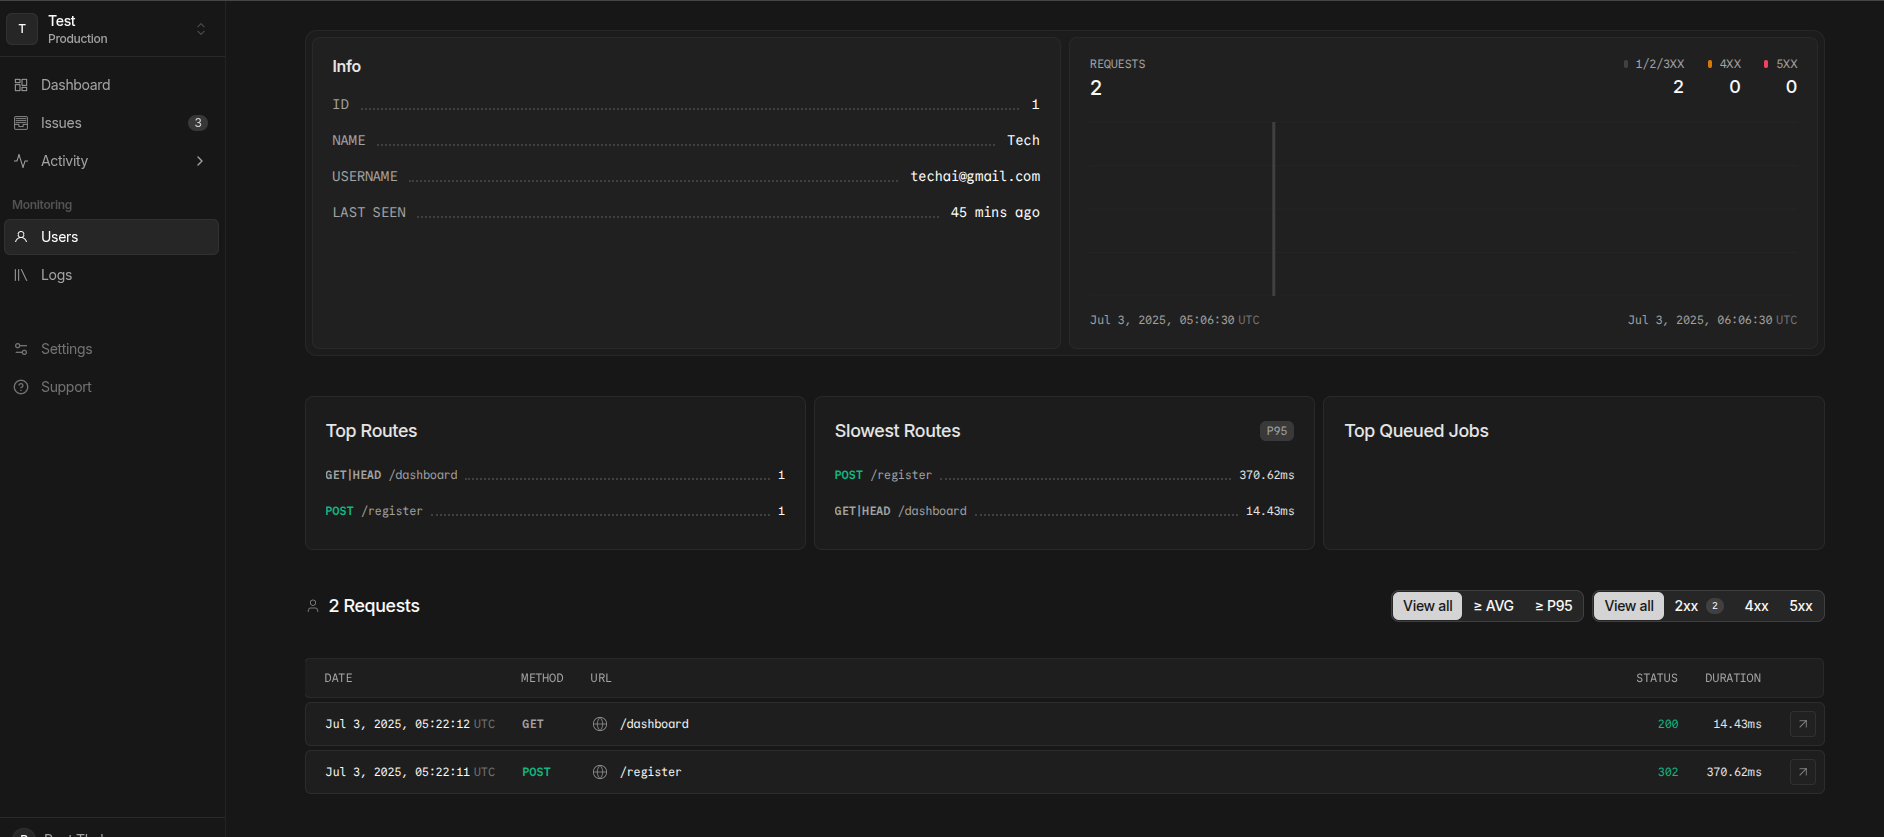
Tracking User Activity with Laravel Nightwatch
- When you click on a user’s email, you’re redirected to their detailed info page.
- From there, you can clearly see which requests were made by that user.
- In simple terms, it shows which pages the user visited.
- Earlier, we had to manually build dashboards to track user activity like this.
- But now, Laravel Nightwatch makes it super easy — no custom setup needed!
Events
An event is basically any activity that happens inside your Laravel application. It’s like having a security camera that records everything your app does, but instead of video, it records data about what happened, when it happened, and how long it took.
Types of Events Nightwatch Captures
Here are the main types of events that Nightwatch automatically tracks:
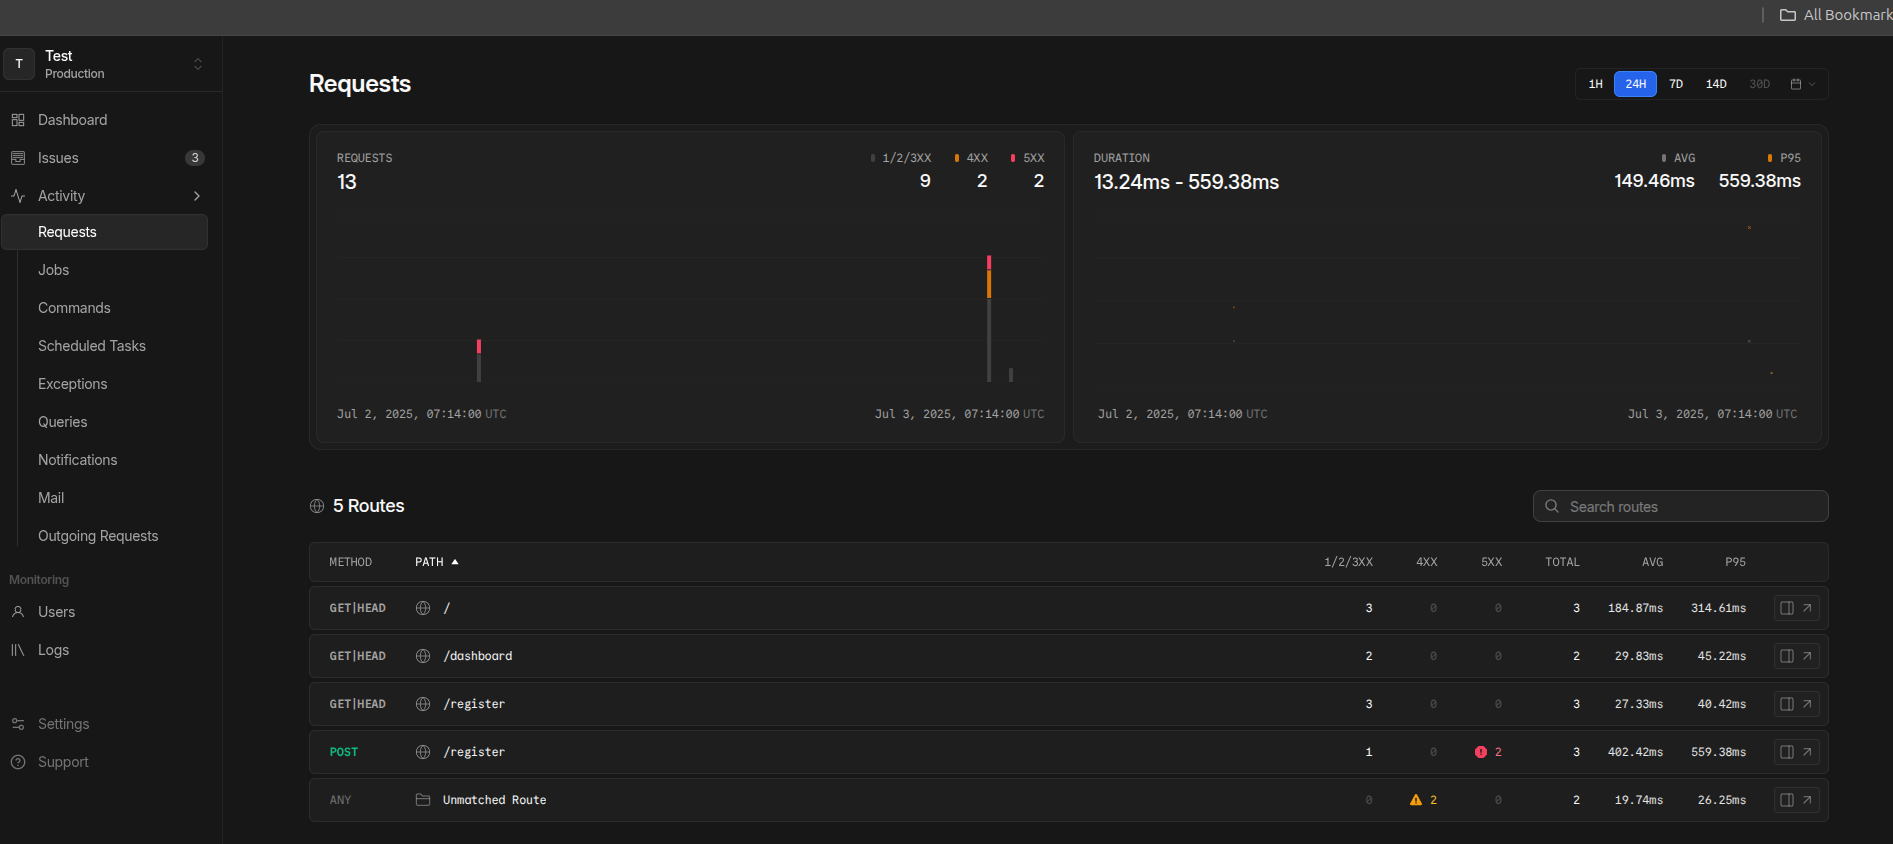
1. Requests
When someone visits your website or uses your API, that’s a request event. Nightwatch records:
- Which page they visited
- How long it took to load
- Whether it was successful or failed
2. Database Queries
Every time your app talks to the database (like getting user info or saving data), that’s a query event. It tracks:
- What data was requested
- How long the database took to respond
- Which database connection was used
3. Jobs
When your app does background work (like sending emails or processing images), those are job events. It captures:
- What job was running
- How long it took
- Whether it completed successfully or failed
4. Cache Events
When your app stores or retrieves data from cache (to make things faster), those are cache events:
- What was stored or retrieved
- Whether it was a “hit” (found) or “miss” (not found)
5. Mail Events
Every email your app sends gets tracked:
- Who it was sent to
- What the subject was
- Whether it was delivered successfully
6. Exceptions (Errors)
When something goes wrong in your app, that’s an exception event:
- What error occurred
- Where in your code it happened
- What led up to the error
7. Commands
When you run Artisan commands (like php artisan migrate), those are command events
8. Notifications
When your app sends notifications (SMS, Slack messages, etc.), those are notification events
Why Events Matter
Events help you understand:
- Performance: Is your app running fast or slow?
- Problems: What’s breaking and why?
- Usage: How are people using your app?
- Debugging: What happened before an error occurred?
Real-World Example
Imagine a user logs into your app. Here’s what events Nightwatch might capture:
- Request Event: User visits
/loginpage - Query Event: App checks user credentials in database
- Cache Event: App stores user session in cache
- Mail Event: App sends “successful login” email
- Request Event: User gets redirected to dashboard
Each of these is a separate event with its own details and timing information.
Key Takeaway
Events are simply records of what your Laravel application does. Nightwatch automatically captures these records so you can see how your app is performing and quickly spot any problems – all without you having to write any extra code!
You can see all these event result inside the ‘Activity’ option
Sampling
Sampling in Nightwatch is a way to control how much data you collect from your Laravel application. Instead of recording every single thing that happens, you can choose to record only a percentage of events.
In simple term: Think of sampling like taking photos at a party. Instead of taking a picture of every single moment (which would fill up your phone’s storage quickly), you might take photos of every 10th moment to still capture the essence of the party without overwhelming your storage.
Why Do We Need Sampling?
Let’s say your website gets 1000 visitors per day:
- No sampling (1.0): Record all 1000 visits
- 50% sampling (0.5): Record about 500 visits
- 10% sampling (0.1): Record about 100 visits
You still get a good picture of how your site is performing, but with much less data!
Types of Sampling You Can Control
1. Request Sampling
Control how many website visits to record:
NIGHTWATCH_REQUEST_SAMPLE_RATE=0.1 # Record 10% of visits
2. Command Sampling
Control how many Artisan commands to record:
NIGHTWATCH_COMMAND_SAMPLE_RATE=1.0 # Record all commands
3. Exception Sampling
Control how many errors to record:
NIGHTWATCH_EXCEPTION_SAMPLE_RATE=1.0 # Record all errors (recommended)
The documentation suggests these settings for beginners:
Why these settings?
- Errors are important – you want to catch all of them
- Commands are usually few – so capturing all is fine
- Requests can be many – so 10% gives you good insights without overwhelming data
Route-Specific Sampling
You can also set different sampling rates for different parts of your website:
// Sample 80% of user profile visits
Route::get('/users', [UserController::class, 'index'])
    ->middleware(Sample::rate(0.8));

// Sample only 20% of less important pages
Route::middleware(Sample::rate(0.2))->group(function () {
    // Less critical routes here
});
Think of sampling like a security camera system:
- Recording 24/7 (100% sampling) uses lots of storage
- Recording every 10 minutes (10% sampling) still catches important events
- You can set some cameras to record more frequently in high-security areas (route-specific sampling)
Logging
Think of logging like keeping a diary for your web application. Just like you might write down important events in your personal diary, your Laravel application writes down important events that happen while it’s running.
Why Do We Need Logging?
Imagine you’re running a restaurant and something goes wrong – maybe a customer complains about their food. Without any records, you wouldn’t know:
- What happened?
- When did it happen?
- Who was involved?
- What caused the problem?
Similarly, when your web application has problems, logs help you understand what went wrong and when.
Simple Setup Example
To send your Laravel logs to Nightwatch, you just need to add this to your .env file:
LOG_CHANNEL=stack
LOG_STACK=single,nightwatch
This tells Laravel: “Save logs to files AND send them to Nightwatch too.”
Other Providers
Think of “Other Providers” as different places where you can host (put) your Laravel website on the internet. It’s like choosing where to rent an apartment – you have many options!
The Big Picture
When you build a Laravel website, you need to put it somewhere on the internet so people can visit it. You have several choices:
What Makes “Other Providers” Different?
With Laravel Cloud/Forge, Nightwatch setup is automatic – like having a concierge service that does everything for you.
With “Other Providers”, you need to do the setup manually – like setting up your own apartment from scratch.
- The basic setup has already been covered in Step 1 (see the “Install Laravel Nightwatch” section above).
- The tricky part is making sure Nightwatch keeps running 24/7. You have two main options: Option A: Using Systemd (Recommended)Option B: Using Supervisor
The documentation provides detailed step-by-step instructions for setting up Nightwatch on these “other providers,”
Automated Browser Testing Made Easy with Laravel Nightwatch
For more insightful tutorials, visit our Tech Blogs and explore the latest in Laravel, AI, and Vue.js development!

