If you’re using GitHub often, you’ve probably seen suggestions to use SSH keys instead of typing your username and password every time you push code. But if you’ve never done it before, it might sound confusing.
In this blog post, I’ll explain:
- What SSH keys are
- Why you should use them with GitHub
- How to set them up step-by-step
- How to test and troubleshoot
What Are SSH Keys?
SSH keys are a secure way to log into a remote system without using a password. They come in a pair:
- Public key – This gets shared with GitHub.
- Private key – This stays safe on your computer.
Think of it like a mailbox. Anyone can drop mail (your public key is on GitHub), but only you have the key to open the mailbox (your private key).
Why Use SSH with GitHub?
When using Git over HTTPS, GitHub will ask for your username and password every time you interact with the repo — unless you use a credential manager.
SSH solves this! Once you set it up:
- No password needed each time
- More secure than using a password
- Works well with automation and CI/CD pipelines
Why Use SSH with GitHub (vs Personal Access Token)
When you push or pull code to/from GitHub, Git needs to authenticate you.
There are two main ways:
- HTTPS + Personal Access Token (PAT)
- SSH Key Authentication
Both let you skip typing your GitHub username and password every time — but SSH is often more secure and more convenient long-term.
SSH is better than a token because it uses a secure key stored only on your device, so nothing sensitive is sent over the internet. It’s safer, easier for automation, and you don’t have to keep renewing it.
Step-by-Step: Setting Up SSH Keys for GitHub
Let’s dive into the actual process.
Step 1: Check for Existing SSH Keys
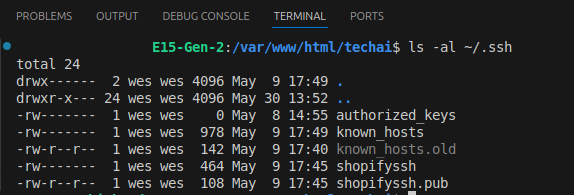
Open your terminal or Git Bash and type:
ls -al ~/.ssh
If you see files like id_rsa and id_rsa.pub, you already have SSH keys. You can skip to Step 3.
If not, continue to the next step.(In simple term if you see any .pub that means the SSH key exist and the the front name anything, because its a custom name eg: techai.pub)

Step 2: Generate a New SSH Key
Run the following command in your terminal:
ssh-keygen -t ed25519 -C "your_email@example.com"
t ed25519= use the recommended algorithmCadds a label with your email
Note: If you’re using a legacy system that doesn’t support theed25519algorithm, use:ssh-keygen -t rsa -b 4096 -C "[your_email@example.com](<mailto:your_email@example.com>)"
When prompted to save the key, press Enter to accept the default location:

Enter a file in which to save the key (/home/you/.ssh/id_ed25519): [Press enter]
Then you’ll be asked to add a passphrase (optional but recommended). You can skip it by pressing Enter twice.
Step 3: Add SSH Key to SSH Agent
The SSH agent manages your keys in the background.
- Start the SSH agent:
eval "$(ssh-agent -s)"
2. Then add your new key:
ssh-add ~/.ssh/id_ed25519
✅ Tip: If you used a custom filename, update the path accordingly. like tech_ai is the custom name
ssh-add tech_ai
Step 4: Add Your Public Key to GitHub
First, copy your public key to the clipboard:
cat ~/.ssh/id_ed25519.pub
✅ Tip: If you used a custom filename, update the path accordingly. like tech_ai is the custom name
cat tech_ai.pub
Copy the entire output (starts with ssh-ed25519 and ends with your email).
Then:
- Go to GitHub → Settings → SSH and GPG Keyshttps://github.com/settings/keys
- Click New SSH Key
- Add a title (e.g., “My Laptop”) and paste your key
- Click Add SSH Key
Boom! 🔐 You’re connected.
Step 5: Test Your Connection by command
Verify that everything is working:
ssh -T [git@github.com](<mailto:git@github.com>)
You might see a warning about the authenticity of the host. Type “yes” to continue.

If you see a message like “Hi username! You’ve successfully authenticated, but GitHub does not provide shell access.” , your SSH key setup is complete!
📚 Useful Links
For more insightful tutorials, visit our Tech Blogs and explore the latest in Laravel, AI, and Vue.js development!


